Introduction
Recently when I started studying HTML5, first question came to my mind was that how does a browser come to know, if written HTML is compatible with HTML v4.1 or HTML v5.
In order to find out the reply of the same query, I started exploring and here I would like to share my knowledge about the same. While exploring, I came to know that all this is controlled by a tag called <!DOCTYPE> which is a very first tag in most of the web pages which really made me surprised because every web page has this tag added automatically whenever a page added using some IDE but I never cared about this tag and never tried to explore but this time Just out of curiosity to know more about this tag, I dug up a little more.
In this article I will be explaining about <!DOCTYPE> tag and will give the answer of following queries.
How does a browser come to know, if the page written is in HTML4.1 or HTML5?
What is a <!DOCTYPE> tag and what does this tag do?
How many types of DOCTYPE HTML4.1 & HTML5 have?
How <!DOCTYPE> affects the rendering of HTML elements on different browsers?
How a wrong “<!DOCTYPE>” make an HTML page invalid?
How to verify, if a page written is valid or not?
How should we decide on defining the type of <!DOCTYPE>?
How <!DOCTYPE> is related to document mode (Standard, Quirks and Almost-standards mode) and How does a browser decide about rendering of a web page in Standard mode or Quirks mode?
Lets Start Exploring
So let’s start answering one by one.
How does a browser come to know, if the page written is in HTML4.1 or HTML5?
As I mentioned earlier that whenever a webpage is added using some IDE, a Tag called <!DOCTYPE> is automatically added on the top of the page which has few attributes defined in it. This <!DOCTYPE> tag represents and signal the browser that the page about the used HTML version. Whenever a browser encounters a webpage that contains a <!DOCTYPE>, it uses the value of the document type to determine the document mode for the webpage. Because HTML 5 has just one <!DOCTYPE> which we will discuss in a little while, so this <!DOCTYPE> is defined like <!DOCTYPE html>. This tag itself denotes that written webpage is compatible with HTML 5. So whenever <!DOCTYPE> is defined as <!DOCTYPE html>, it means the HTML5 is being used.
What is a “DOCTYPE” tag and what does this tag do?
A “Document Type Declaration” or <!DOCTYPE> tag instructs the web browser about the version of HTML, web page is written in and about how other tags will be rendered on the browser.
The <!DOCTYPE> tells a browser, “I’m using HTML 4.01.” When the browser sees that, it assumes you know what you’re talking about and that you really are writing HTML 4.01. That’s good because the browser will use the layout and display rules for HTML 4.01. This tag informs the browser that the written HTML is a Standard and accepted by all the browsers. This Standard could be any one out of 3 standards i.e. Strict, Transitional & Frameset about which we will discuss further down the line.
When “DOCTYPE” is declared in a page then, the browser knows exactly how to handle your page and (at least on any browser you’d care about) the page is going to display as you’d expect. It tells the browser the type of the document.
“DOCTYPE” declaration represents that Standard HTML has been written and the written HTML page is compliant with the standards defined by W3C (Worldwide Web Consortium).
In HTML 4.01, the <!DOCTYPE> declaration refers to a DTD (Document Type Definition) . The DTD specifies the rules for the markup language, so that the browsers render the content correctly.
The purpose of a DTD is to define the legal building blocks of an XML document. A DTD defines the document structure with a list of legal elements and attributes. A DTD can be declared inline inside an XML document, or as an external reference.
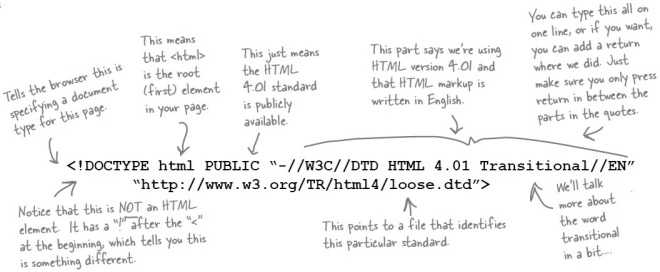
A <!DOCTYPE> tag must be the first tag in an HTML document and it looks like
<!DOCTYPE html PUBLIC “-//W3C//DTD HTML 4.01 Transitional//EN”“http://www.w3.org/TR/html4/loose.dtd”>
The following picture dissects each part of the DOCTYPE tag. Read carefully to get fair understanding about the same.
Document Type Declaration Transitional
Now you might be thinking that we have not talked about the word “Transitional”. What’s with this transitional? If we’re writing “standard” HTML 4.01, why is it transitional? Let’s understand the meaning of the same.
There are actually two DOCTYPEs, one for those transitioning to HTML 4.01, and a stricter DOCTYPE for those who are already there.
Imagine you’ve got a Web site with hundreds of Web pages, all written in nonstandard HTML. You’d like to improve the site and get that entire HTML up to the 4.01 standard, but you’re using lots of old legacy stuff from back in the 2.0 and 3.2 days of HTML. What do you do? Use the HTML 4.01 Transitional DOCTYPE, which allows you to validate your pages but still permits some of the legacy HTML. That way, you can be sure you don’t have any outright mistakes in your markup (like typos, mismatched tags, and so on) but you won’t have to rework your entire HTML to get it to validate. Then, after you’ve removed the entire legacy HTML, you’re all ready for the strict document type, which ensures you have a fully compliant, standardized Web site.
How many types of DOCTYPE HTML4.1, XHTML & HTML5 have?
HTML 4.01 & XHTML has three different <!DOCTYPE> declarations while HTML5 there is only one <!DOCTYPE> declaration.
HTML 4.01 Strict
In this DTD, all HTML elements and attributes are allowed except presentational or deprecated elements (like font). Framesets are also not allowed.
<!DOCTYPE HTML PUBLIC “-//W3C//DTD HTML 4.01//EN” “http://www.w3.org/TR/html4/strict.dtd”>
HTML 4.01 Transitional
In this DTD, all HTML elements and attributes are allowed including presentational or deprecated elements (like font). But still Framesets are not allowed.
<!DOCTYPE HTML PUBLIC “-//W3C//DTD HTML 4.01 Transitional//EN” “http://www.w3.org/TR/html4/loose.dtd”>
HTML 4.01 Frameset
In this DTD, all HTML elements and attributes are allowed including presentational or deprecated elements (like font) along with frameset content.
<!DOCTYPE HTML PUBLIC “-//W3C//DTD HTML 4.01 Frameset//EN” “http://www.w3.org/TR/html4/frameset.dtd”>
XHTML 1.0 Strict
In this DTD, the markup must also be written as well-formed XML. All HTML elements and attributes are allowed except presentational or deprecated elements (like font). Framesets are also not allowed.
This DTD is equivalent to HTML4.01 Strict DTD but the markup must also be written as well-formed XML.
<!DOCTYPE html PUBLIC “-//W3C//DTD XHTML 1.0 Strict//EN” “http://www.w3.org/TR/xhtml1/DTD/xhtml1-strict.dtd”>
XHTML 1.0 Transitional
In this DTD, the markup must also be written as well-formed XML. All HTML elements and attributes are allowed including presentational or deprecated elements (like font). Framesets are also not allowed.
This DTD is equivalent to HTML4.01 Transitional DTD but the markup must also be written as well-formed XML.
<!DOCTYPE html PUBLIC “-//W3C//DTD XHTML 1.0 Transitional//EN” “http://www.w3.org/TR/xhtml1/DTD/xhtml1-transitional.dtd”>
XHTML 1.0 Frameset
This DTD is equal to XHTML 1.0 Transitional, but allows the use of frameset content.
<!DOCTYPE html PUBLIC “-//W3C//DTD XHTML 1.0 Frameset//EN” “http://www.w3.org/TR/xhtml1/DTD/xhtml1-frameset.dtd”>
XHTML 1.1
This DTD is equal to XHTML 1.0 Strict, but allows you to add modules (for example to provide ruby support for East-Asian languages).
<!DOCTYPE html PUBLIC “-//W3C//DTD XHTML 1.1//EN” “http://www.w3.org/TR/xhtml11/DTD/xhtml11.dtd”>
HTML 5
<!DOCTYPE html>
How “<!DOCTYPE>” affects the rendering of HTML elements on different browsers?
Different browsers render the different tags differently. Whenever we define a DOCTYPE, it means we are telling to the browser that HTML Standards of the specified DOCTYPE have been used.
When I think about little past then this really make me smile that I had been so frustrated sometimes that few of the web pages of an application opens in “Quirk” browser mode while some will open in “Standard” browser mode. While exploring about “DOCTYPE”, I came to know that only correct “DOCTYPE” is responsible for opening the webpage in correct browser mode also.
How a wrong “<!DOCTYPE>” make an HTML page invalid?
Defining a wrong DOCTYPE makes Web page invalid. e.g. while developing a page if someone has mentioned the DOCTYPE as Strict and still he uses the deprecated element like “font” then this element makes that page invalid or let us say we have used <img> tag and we have not defined “Alt” attribute to this tag then also it become an invalid page because as per Strict DTD “Alt” attribute is mandatory to define in <img> tag.
How to verify, if a page written is valid or not?
W3C has a website which allows you to validate your webpages against defined “<!DOCTYPE>”.
http://validator.w3.org
This website allows 3 ways to validate a webpage.
- Validate by URI which allows validating a webpage online. If your website is available publically then the webpages can be validated by providing the url directly in the website.
- Validate by File Upload which allows validating a webpage by uploading the page on the website.
- Validate by direct input which allows validating a webpage by coping the markup in the provided area in the website.

W3C Page Validator
How should we decide on defining the type of “<!DOCTYPE>”?
While defining the “<!DOCTYPE>”, big question comes to our mind that how should we decide that what type of DOCTYPE (DTD) we should define. Well it’s quite simple.
Transitional DTD gives us a transition point between old style HTML and standard HTML 4.01 so whenever we have old written webpages and want them to make compatible with latest browser with much hassle we can go for “Transitional” while if we are developing new web page then Strict must be used.
How “<!DOCTYPE>” is related to document’s mode (Standard & Quirks) and How does a browser decide about rendering of a web page in Standard mode or Quirks mode?
The browser will figure out that you’re not really writing HTML 4.01 and go back to quirks mode. And then you’re back to the problem of having the various browsers handle your page in different ways. The only way you can get predictable results is to tell the browser you’re using “HTML 4.01” and to actually do so. As web is becoming a standard day by day and all browsers are willing to support the standards only hence we should use the Standard document mode which can be forced by using <!DOCTYPE html>
While exploring about the DOCTYPE, I came across one of OReilly’s Head First book which had an interesting Interview between Browser and Head First. I would like to share that Interview here which is quite interesting and me to clarify the topic.
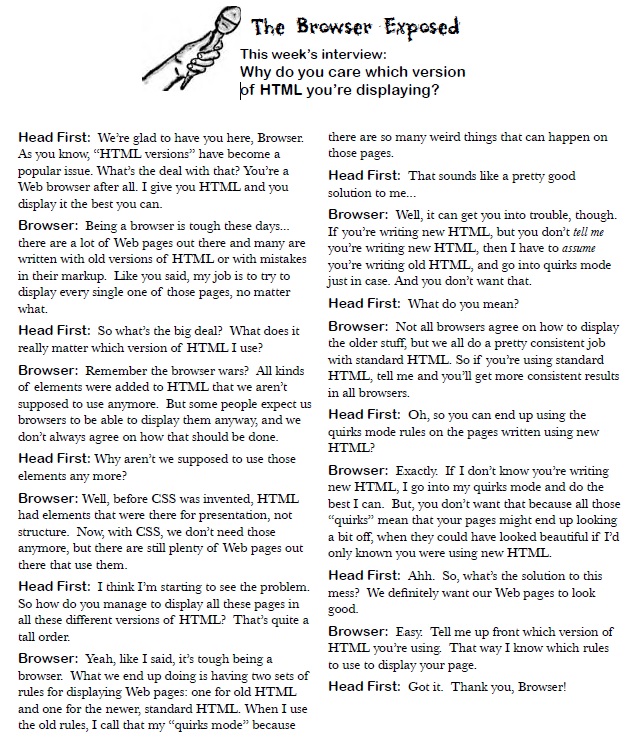
Head First Interview with Browser
In this article we have learnt about <!DOCTYPE> and Document’s mode which are important to render a page consistently in all the browsers. It is always recommended that we use instruct the web page to use the Standard document mode and always define a <!DOCTYPE> in the page to avoid any compatibility issues.
I would appreciate, if you could let me know your feedback about the article content, presentation and coverage which will help me to improve on in my future articles.
Happy Learning…
References
http://msdn.microsoft.com/library/cc288325(v=vs.85).aspx
http://msdn.microsoft.com/en-US/library/gg699340(v=vs.85).aspx
http://msdn.microsoft.com/en-US/library/gg699338(v=vs.85).aspx